I just finished converting my Orion 10” DOB (2/23/03)
and have given it a test run in my den. I chose Lenord’s Evolution system
because it allowed to me track objects, perform CCD photography (eventually)
and reap the benefits of total computer control while utilizing my existing
investment in equipment. The fact that is as sophisticated as it is, in
conjunction with the fact it is a DIY project, was very appealing to me.
I knew absolutely nothing about telescope tracking systems when I started.
In fact I didn’t even know what questions to ask. Lenord was very helpful
and VERY responsive to my email queries. Now that the project is finished
I actually feel like I understand how most of this stuff works. I
have come a long way in just a couple of months (with Lenord’s help).
Each installation will be different depending on the
type of scope and rocker box. Converting my Orion was actually very straightforward
and was done with very little damage to the original installation. The
scope could easily be returned to “factory” condition with only a few minor
screw holes here and there to contend with.
Following are some of the things I did to customize
my installation.
-
Replaced with triangular Orion ground board with
a 22” circular one provided by Lenord. Transferred the rubber feet and
Teflon pads from the old board to the new one.
-
Routed out a slot in the bottom of the upper AZ circle
for the black AZ drive assembly mounting plate to fit in. These allowed
me to continue using the standard “factory” clearance between the ground
board and AZ circle. I also counter-sunk the screw holes in the mounting
plate so that the machine screw heads would be flush with the plate.
With thick Teflon pads this step would probably be unnecessary but this
is a do-it-yourself project so I did it because it seemed like the classy
way to do. Also, I used the 2” drive spline supplied by Lenord to achieve
faster slewing rates.
-
Cut out two mouse pads and installed them between the
original plastic ALT bearings and the tube assembly. They provided the
necessary thickness to remove the left to right play that existing in the
standard DOB mount from Orion. I’m not sure this step is necessary either,
but I figured anything that had slop in it could cause problems later down
the road.
-
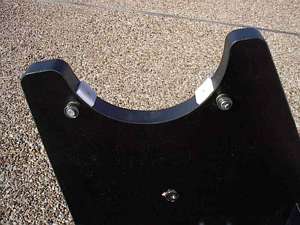
Added small bearings (from Lenord) to the inside of the
rocker box to take the load off of the ALT Teflon pads. This essentially
removed all friction on the ALT axis. I went ahead and left the Teflon
pads in place for possible later use.
-
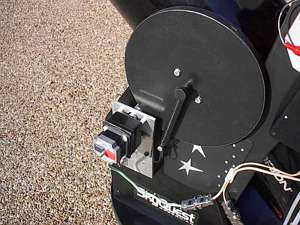
Added an 11” ALT wheel (from Lenord) to the outside of
the existing Orion plastic bearing. Had to extend the length of the existing
mounting bolts by 1” to accommodate the additional thickness of the wheel.
I also had to extend the bottom spring tensioner bolt on the drive side
an rextra inch so the spring would still slip onto it. I stretched
the original spring just slightly to minimize the downward pull on the
small ALT bearings that I added inside the rocker box. There is just enough
tension to keep the drive spline in constant contact with the 11” alt wheel.
-
Added a two-way level to the inside of the rocker box
to aid in alignment. Will probably add a small compass later too.
-
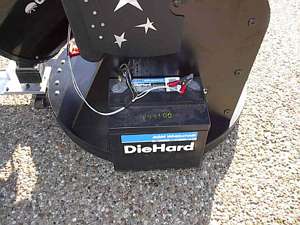
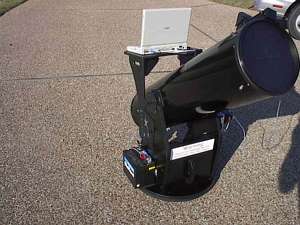
Added slip resistant padding (the type that is commonly
found in the bottom of pickup toolboxes) to the outside lip of the rocker
box assembly to support a UD1 Deep Cycle Battery (mine is a 40aH wheelchair
battery that came from Sears. The automotive manager at the local Walmart
wasn’t interested in helping me get Lenord’s suggested battery. What a
customer-service disaster!!! Thank goodness for Sears). By using
the padding I did not have to mount the battery at all. It stays in its
place quite well.
-
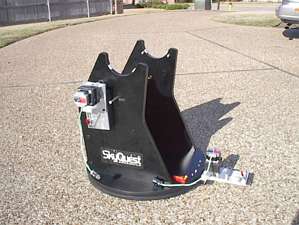
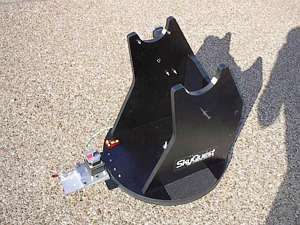
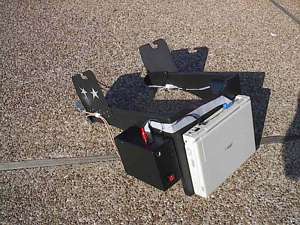
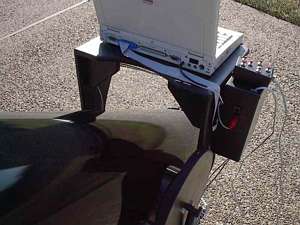
My pride and joy is the shelf assembly that was built
by a good friend of mine. He works wonders with this stuff and prides himself
on his ability to invent, cut and fit. He outdid himself on this one.
The shelf is a one piece unit that simply slips over the lower spring tensioner
bolts on each side of the RB. With a gentle downward push the whole unit
simply locks onto place – no tools needed. I just connect the battery on
one side and the motors on the other and I’m off and running. One
of the really nice features of the shelf assemble is that it stops the
scope tube at exactly 0 degrees Altitude. Makes initialization very easy.
It’s really neat. Did you notice the Stars he put on the side?? Thanks
Milton!! Milton helped me on some of the above items as well.
-
I mounted Mel’s control box to the side of the shelf instead
of putting it under the laptop. It seemed a little more stable that way.
I had to extend the ribbon cable coming from the control box just slightly
to pull this off. I also put a small piece of Velcro on top of the control
box to hold the hand control when it is not in use.
My object in doing this project was to have a scope
that would simply slip together after transporting it. No tools should
be necessary. That objective was attained. The entire unit comes apart
in four pieces. 1) Tube, 2) Rocker Box, 3) Battery and 4) Shelf assembly
with attached computer and control unit.
Setting the backlash and step size parameters was the
most challenging point in the whole project as it requires mathematical
calculations (based on spline, ALT circle and ground board diameters along
with motor step size and gearbox ratio). The formula for calculating the
step size parameters gives you a good starting point but it takes a little
trial and error to find the exact point where the computer and stepper
motor both agree on the distance traveled by each axis. The Backlash
setting (that compensates for slop in the gears and other factors when
the motors reverse) was also an easy trial and error adjustment. Lenord
did a good job of explaining how to set all of these parameters in his
DOB Manual.
I’ll be taking the unit out tonight to try it under
the stars. Getting familiar with the controls in the den or living room
is a necessity. Although the operation is simple, getting familiar with
controls in the dark, no matter how simple they may be, would have been
more than I cared to tackle. Now that I am familiar with the alignment
procedures taking it out for its test run will be much easier.
Thanks Lenord for your guidance, patience and ingenuity.
I’m sure I’ll be corresponding with you soon as I become more familiar
with this beauty.
Mike Makowski
McGregor, TX
mikem@btslink.com
|


